Workflows
As a best practice, it is strongly recommended to:
- ensure your working state in version control is clean and has no other changes before making data changes via the following workflows.
- commit the changes from each workflow to version control before moving onto another workflow or making other changes to your Unity project.
If you follow the above, you can safely and easily undo changes to your GameDataSync configuration and synchronized data via your version control system.
Configuration Changes
- Make configuration changes as documented in the Setup guide.
- Save your Unity project via Ctrl+S (Windows) or Cmd+S (MacOS), or via File Save Project.
- Commit your new or modified
AirtableConfiguration.asset(andAirtableConfiguration.asset.metaif new or modified) to version control.
Data Synchronization
- Press
 .
. - If necessary, adjust which bases, tables, and/or fields are synced.
- Press
 .
. - Wait for the synchronization process to complete.
- Save your Unity project via Ctrl+S (Windows) or Cmd+S (MacOS), or via File Save Project.
- Commit your
AirtableConfiguration.assetif modified and your new or modified C# classes andScriptableObjectassets to version control.
Info
Unity may recompile scripts in the middle of the synchronization process. This is necessary whenever new tables are synced or any table schemas have changed; the associated C# classes must be rewritten and recompiled before updating the data in all of your ScriptableObject assets.
Syncing Arrays
Airtable provides limited support for array-like data in individual record fields, e.g. via Link to another record and Multiple Select fields. To expand upon Airtable's behavior, GameDataSync can synchronize comma-delimited string fields in Airtable into typed arrays in Unity ScriptableObjects:
- Check the Is Array checkbox for any fields that you would like to sync as arrays.
- Enter field data in Airtable for those fields as comma-delimited strings, e.g.
1,2,3,4,5. - Synchronize and review your data; the associated fields should be represented as
int[],string[], etc. arrays containing the comma-delimited values, e.g.[ 1, 2, 3, 4, 5 ].
Configuring Unidirectional Table Relationships
Airtable provides direct support for authoring game data that references other data via linked records. For example, we can make a Monsters table, a Stat Blocks table, and an Items table in Airtable, and configure each Monster record to reference a Stat Block record via a field named Stat Block, and one or more Item records via a field named Loot:

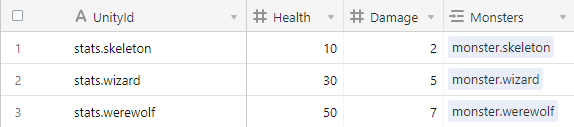

However, we can see that Airtable automatically creates and enforces bidirectional relationships between our tables - the Stat Blocks and Items records were given a Monsters field that points back to the Monster record(s) that reference them.
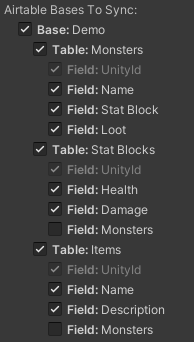
In cases where we only want unidirectional relationships instead of bidirectional relationships in our Unity assets, i.e. we only want our Monsters referencing our Stat Blocks and Items, but not the other way around, we can configure GameDataSync to skip fields that we don't want to sync.
In this case, we would uncheck the Monsters fields on the Stat Blocks and Items tables, like so:
Renaming Fields
- Rename the field in Airtable as desired.
- Press in Unity to pick up the field rename.
- Press to update the field name in C# and on the associated
ScriptableObjects.- If you have previously synced your data and your game code references the old field name, you will encounter compile errors in your game code during data synchronization. The Airtable data sync will pause until the compiler errors are resolved and then finish the sync.
Compile errors are easily resolved by updating references to the renamed field(s) in your game code. For example, assume we have a UI script that displays a monster'sNamevalue, but we have renamed that field toMonsterNamein Airtable. We fix our compile error with the following change:MonsterNameDisplay.csusing UnityEngine; using UnityEngine.UI; public class MonsterNameDisplay : MonoBehaviour { public Text monsterNameText; public Monster monster; void Start() { - monsterNameText.text = monster.Name; + monsterNameText.text = monster.MonsterName; } }
- If you have previously synced your data and your game code references the old field name, you will encounter compile errors in your game code during data synchronization. The Airtable data sync will pause until the compiler errors are resolved and then finish the sync.
- Save your Unity project via Ctrl+S (Windows) or Cmd+S (MacOS), or via File Save Project.
- Commit your modified
AirtableConfiguration.asset, C# classes and references, andScriptableObjects to version control.
Renaming Tables
If you have previously synced a table's data into Unity and you wish to rename the table, perform the following steps:
- In Airtable, rename the table to the desired name.
- In your IDE, terminal, or system file explorer - not in Unity - locate the folder containing the C# classes for the table you wish to rename. The folder will be located at
Assets/{gamedatasync_output_directory}/Classes/{airtable_base_name}. - Rename both the C# class file and the associated meta file to the sanitized new table name.
- Example:
Assets/GameDataSync/Classes/Demo/Monster.csAssets.GameDataSync/Classes/Demo/Enemy.cs,Assets/GameDataSync/Classes/Demo/Monster.cs.metaAssets.GameDataSync/Classes/Demo/Enemy.cs.meta.
- Example:
- In your IDE, terminal, or system file explorer - not in Unity - locate the folder containing the
ScriptableObjects for the table you wish to rename. The folder will be located atAssets/{gamedatasync_output_directory}/ScriptableObjects/{airtable_base_name}/{airtable_table_name}/. - Rename the folder to the sanitized new table name.
- Example:
Assets/GameDataSync/ScriptableObjects/Demo/Monster/Assets/GameDataSync/ScriptableObjects/Demo/Enemy/.
- Example:
- Use your IDE to refactor the class name to the sanitized new table name.
- Example:
public class Monster : AirtableScriptableObjectpublic class Enemy : AirtableScriptableObject. Use your IDE's refactoring functionality to update references automatically for you.
- Example:
- Navigate to Unity and wait for recompilation, then confirm your existing assets and references are intact.
- Press in Unity to pick up the table rename.
- Press .
- Save your Unity project via Ctrl+S (Windows) or Cmd+S (MacOS), or via File Save Project.
- Commit your modified
AirtableConfiguration.asset, C# classes and references, andScriptableObjects to version control.
Renaming Bases
If you have previously synced a base's tables into Unity and you wish to rename the base that owns those tables, perform the following steps:
- In Airtable, rename the base to the desired name.
- In your IDE, terminal, system file explorer, or Unity, locate the folder containing the C# classes for the base you wish to rename and rename the folder to the sanitized new base name. The folder will be located at
Assets/{gamedatasync_output_directory}/Classes/{airtable_base_name}.- Example:
Assets/GameDataSync/Classes/MyOldBaseName/Assets.GameDataSync/Classes/MyNewBaseName/.
- Example:
- In Unity, locate the folder containing the
ScriptableObjectassets for the base you wish to rename and rename the folder to the sanitized new base name. The folder will be located atAssets/{gamedatasync_output_directory}/ScriptableObjects/{airtable_base_name}.- Example:
Assets/GameDataSync/ScriptableObjects/MyOldBaseName/Assets.GameDataSync/ScriptableObjects/MyNewBaseName/.
- Example:
- Open one of the C# class files within one of the
Assets/{gamedatasync_output_directory}/Classes/{airtable_base_name}subfolders. - Use your IDE to refactor the C# namespace to the sanitized new base name.
- Example:
namespace GameDataSync.Runtime.MyOldBaseNamenamespace GameDataSync.Runtime.MyNewBaseName.
- Example:
- Press in Unity to pick up the base rename.
- Press .
- Save your Unity project via Ctrl+S (Windows) or Cmd+S (MacOS), or via File Save Project.
- Commit your modified
AirtableConfiguration.asset, C# classes and references, andScriptableObjects to version control.